Last week, we, the Technical Committee Team for CTF COMPFEST 15 open sourced our attack defense platform (we don't have a name for it yet, though). The platform manages almost everything related to the competition, from privisioning challenges to servers to leaderboard scoring. In this post, I will share my experience building this platform along with others.
Heads Up!
While I try to keep this post to be as easy to digest as possible, it would benefit you most if you have known about computer networking. The post will also be in order of chronological time, kind of like a walkthrough.I will use "we" and "I" interchangibly. "We" represents me as the member of the Technical Commitee Team, whereas "I" represents my personal feeling.
Beginning
This year, the team in COMPFEST wanted to run for attack defense for the finals again, after a few years of the final being jeopardy—heard that it was due to the pandemic. This poses a lot of challenges for us, primarily because the number of people that have experienced attack-defense CTF is limited, so we had a few problems due to low number of information in regards to system design.
In the middle of the block, we asked kak Faishol (some of you might know him as "bonceng") for assistance. He accepted to the lengths as far as to build the system from scratch altogether. This was honestly a relief, as we have someone who has more knowledge about the structure of the competition more than us.
Requirements
As with any projects, there will always be requirements that needs to be met. The requirements were as follows:
- The platform is able to manage services (privisioning, reset, restart, rotating flags)
- The platform is able to do score calculation
- The platform is able to manage flags
- The challenge servers cannot be accessed from public
- All participants need to use VPN
The list is pretty small, but it turns out that this has become much more complex than we thought. However, I will only talk about those that I find most interesting.
Tech Stack
We settled with one backend server and one frontend server. The backend is written in Python with Flask framework, along with Celery as our worker. The frontend is written in Typescript with Next.js framework. We did not go experimental and use cutting-edge framework, as much as I want to when it comes to "side" projects, so we only use frameworks that are proven to be stable.
There is a cache layer that is just a simple redis server managed by Flask-Caching, and our database of choice is PostgresQL. No reason as to why we use Postgres, and considering it is using SQLAlchemy, you might get away with other DBMS as well, though I never personally tested it.
For deployment, we use Docker to containerize the backend. Ansible is also used to privision all the servers, including the VPN and challenge servers. The frontend is deployed to Vercel Railway with no other configuration except changing the environment variables.
Managing Services and Flags
Before I begin, let me clear up a few things:
- "Services" in this case means the challenge that is deployed in a server
- Each team has one server dedicated to their services (this can be changed to each challenge can have its own server using
SERVER_MODE=sharing) - The code for this part are all done by kak Faishol, and I only explain it in higher level
All of the management features are done via the celery worker, ensuring that the main backend application stays intact and only does what its thing—serving the data to frontend.
SSH Communication
In order to communicate via SSH, we store the private key of each server during configuration of the contest, and have the following (rough) table of the server:
CREATE TABLE servers(
    id int PRIMARY KEY,
    host TEXT,
    username TEXT,
    private_key TEXT
);
So, whenever we need to communicate, we simply pull the authentication data from the table, and use it.
As for how we communicate via SSH, we use the paramiko library to do that. It also has support to do file transfer, just like SCP.
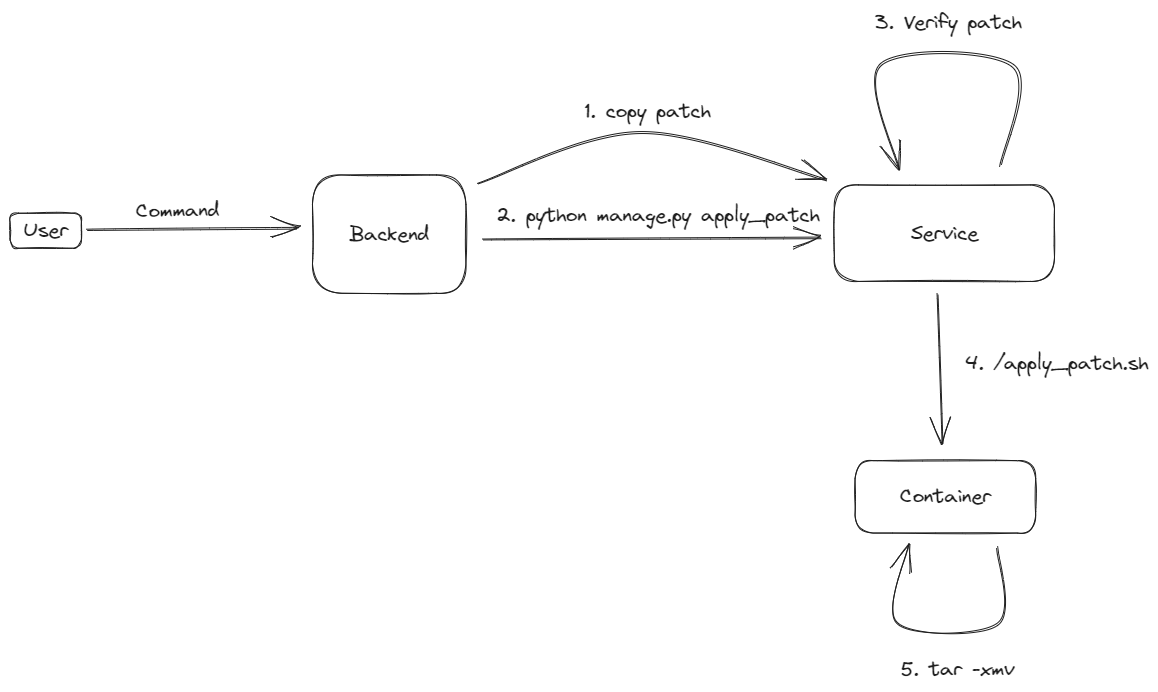
Service Management
To do service management, what we do in general is simple—simply SSH to the server, and send all the shell commands there...
...except, it doesn't end there. While we do technically "just" SSH to the server and send a shell command, we actually call a manage script of said service that will do the actual management. Think of it like manage.py in a Django project. The platform simply call said script, and tell the script what to do.
The manage script itself can be seen here. Essentially, it is a wrapper around docker compose when it comes to service management.
Manager Script
As mentioned earlier, this script is the center of all service management. It controls starting, restarting, stopping, and patching the service. This script is located in the service's folder in the remote server. For example, if the team ID is 1, the service ID is 1, and the REMOTE_DIR config is /opt/adce_svc, then it is at /opt/adce_svc/t1-s1-svc/manage.py.
This script is the entrypoint for all SSH commands sent by the server, as internally they will always run python manage.py <command>.
Whenever this script runs, it will result into the file meta/meta.yml, which will be periodically fetched by the backend to update the log file shown in the frontend.
In general, the script does the following shell commands for each command:
- Start:
docker compose up --build -d - Stop:
docker compose down --volumes --timeout 3 - Restart:
docker compose restart --timeout 3 - Reset: Stops the service, restore the original source code directory, then runs start
- Patch: Checks the validity of patch, then patch the source code inside the container
In general, this is how the script works:

Patching Service
This one is not very different from managing service, we simply send the patch file to the service's patch folder, then run the manage script again to run checks and patch each container accordingly.
The checks done in this stage are the paths relative to the container of the files that can be patched. It is checked via the challenge's patchrule.yml, that is provided by the challenge creator.
For example, if you have the following patchrule:
patchrule.yml
whitelist:
    container:
        - /app/main.py
blacklist:
    container:
        - /
That means, you may be able to patch container/app/main.py, but not anything else in the system.
Once the check is successful, the patch will then be extracted in the container via a tar command, replacing all the files.
Rotating Flag
This one is extremely simple. We create a mount in the container so that /flag will be linked to the service's flag directory. So to rotate a flag, we just replace the flag file in the service's flag directory and it will be in effect immediately!
Issue
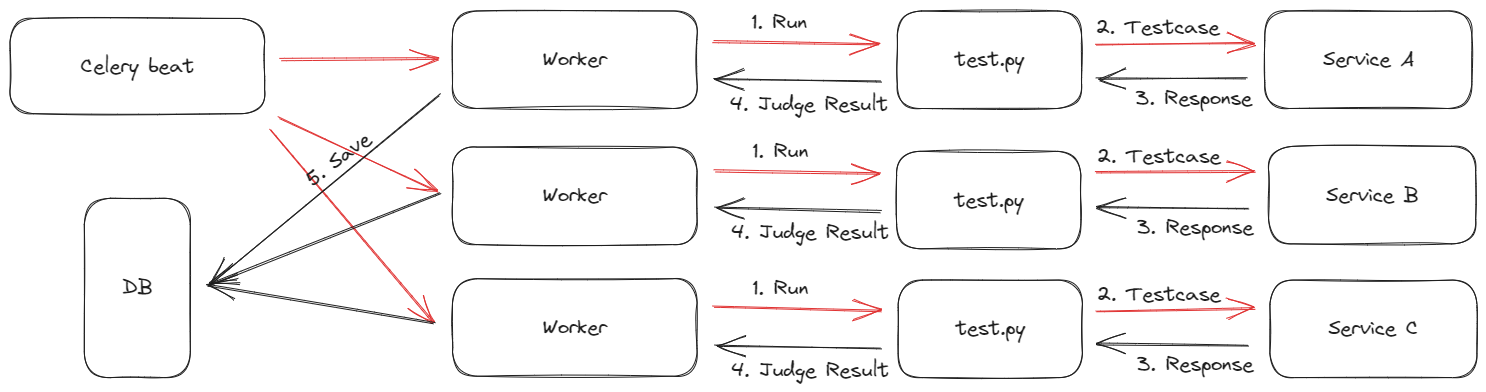
During the competition, we noticed a huge CPU spike whenever the checker or flag rotator is running, and one of the server is failing. My hypothesis is that it tries to connect eitherway, but since it could not get any response, it will wait until a specified timeout. Due to this wait time, all of the other tasks are piled up, and now runs at the same time once said timeout is done.
Checker
Creating a checker can be painful, especially when the services are in a container, and the challenge creator might not know about how the infrastructure works. To relief the pain, kak Faishol creates a custom library to keep things consistent and simple. We named it fulgens. This library is mandatory for all checkers, as the entry point will give a fulgens.ChallengeHelper instance that should be used throughout the test. Not only that, we require the test file to be named exactly test.py and have a function do_check(helper: ChallengeHelper) -> Verdict declared in the file.
For the checker, it will be run in a separate celery worker in the backend server, this time it is specifically made for running just the checker. This is done because checker might be quite intensive, and is happening every 60 seconds. If there were to be any interruption by other tasks, the checker task might be delayed. Of course, this is not the behavior that we desire, as any delay might cause a lot of side effects, notably in scoring.
It is also possible for the test script to have custom requirements, such as installing requests. The test can have a requirements.txt file and list all the dependencies to be installed. However, we strictly limit the execution to Python, so any other custom runtime such as sage is not supported.
Deployment and Networking
System Specification
To preface this, let's talk about system specification. We provide:
- One server for each team's services, each of them carries 2 vCPU and 4GB of RAM. Since we have 15 teams, that's 30 vCPU and 60GB of RAM
- One server for backend, carrying 8 vCPU and 16GB of RAM
- One for VPN, carrying 4vCPU and 4GB of RAM.
- Frontend is not counted here as it is deployed in an external provider.
In total, we have need to have 44 vCPU and 80GB fo resources. As it turns out, Google Cloud has a limit of 24 vCPU for Jakarta region per account. This is a huge block for us, and we are running out of time. We have a few options:
- Ask Google to extend the limit for us
This is a viable idea, but our time was limited, so we are afraid we might not have enough time to do it. - Reduce the challenge server specs
Risky move, there are few services that would require CPU intensive task, one of it being compiling a Next.js project anytime a file changes. That would cause a lot of issues such as server freezing anytime something changes. - Create a new account, and figure out how to connect the networks
This would require a lot of exploration and uncertainty of how it'd work, since I had no experience dealing this, and debugging network might not be something that I find all too pleasuring. - Use another region
This would work, but the added latency might cause a problem and will add extra variable for inconsistencies.
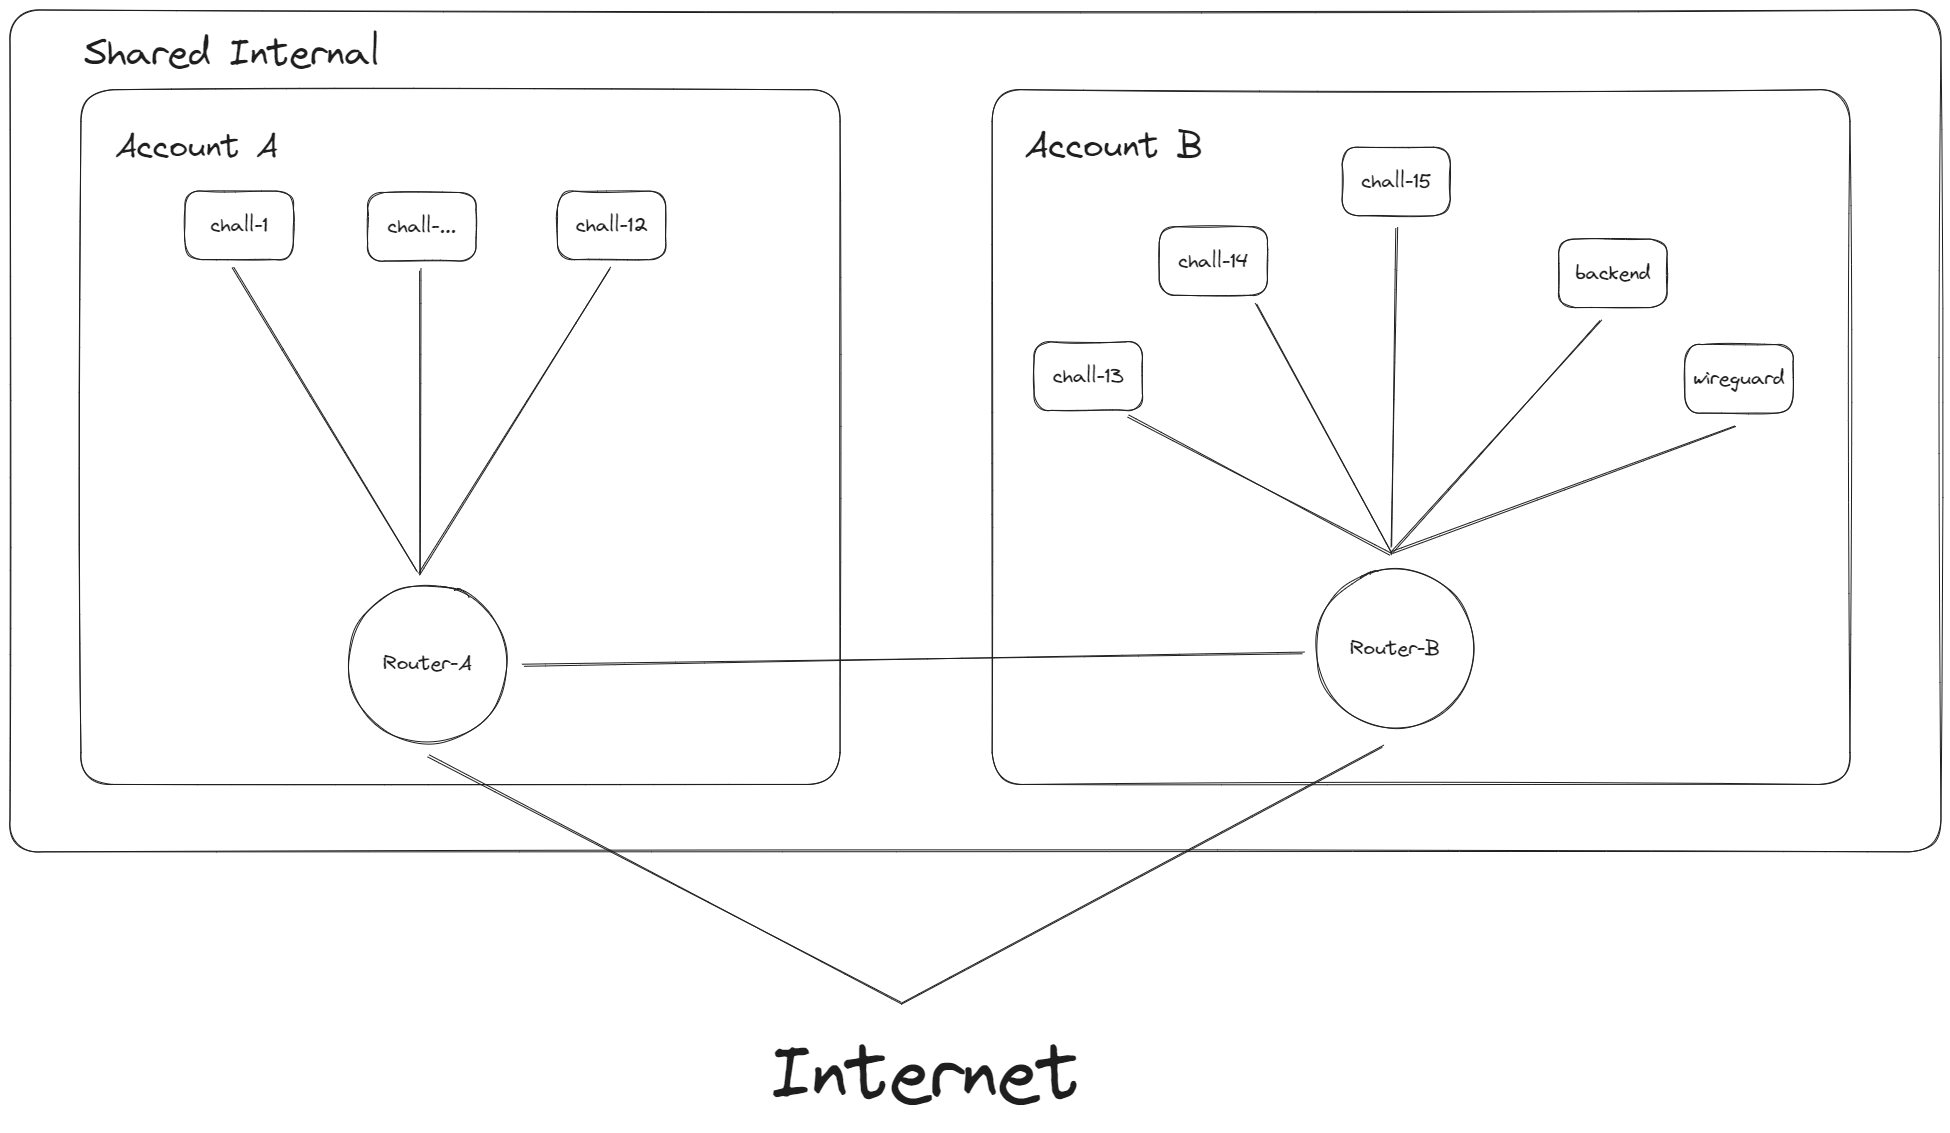
We ended up deciding the third option. We asked the COMPFEST manager for extra balance in Google Cloud, and created the new account. We decided to have 12 challenge servers for one account (that's exactly 24 vCPU), and 3 challenge servers + VPN + backend in the other account (that's 18 vCPU used)
Since we need to connect both account's machines, I will need to explore all the options available in order to connect them.
The Router: VPC
During my exploration, I stumbled upon VPC peering. Essentially, this feature allows two different VPC to share the same internal network, as long as there is no conflict in subnets. Said limitation is actually a problem for us, because the default one will assign a predefined subnets, which naturally would be conflicting. Therefore, we need to create two new VPC for this.
The setup that I was going for each VPC was:
- IP range for asia-southeast2:
10.0.0.0/20for account A and10.2.0.0/20for account B
They will have the IP range of10.0.0.0 - 10.0.15.255and10.2.0.0 - 10.2.15.255respectively, they don't overlap and it is more than enough for our servers. - Gateway:
10.0.0.1and10.2.0.1 - Firewall: Added allowance for all the chall ports and SSH.
After creating both VPC, we can create a VPC network peer in both accounts. After all set up, all of the servers in both accounts are able to communicate via their internal IP.
NAT
Remember when I said that the server cannot be accessed by public? So I had this bright idea that all the server challenges may not have external IP at all. This is great because now I can guarantee that there is no way to connect the machine outside the internal network. But the downside is that it cannot connect to the internet at all.
Now, I know most of you that already took your network certification or class would facepalm at what I said since that would only be natural. Well, at least I actually did to myself. But now I have to create a NAT for both accounts so all the internal services can connect to the internet. Thankfully, it is only a matter of clicking here and there, and the set up is really intuitive.
In the end, the network topology looks similar to this:
VPN
The VPN in this context is meant as the gateway for the players to be able to connect to the internal services. We need this not only for assurement that only authorized people can access all the services, but also to anonymize all the requests to the challenge servers. All requests in the network will look like it comes from the same IP address—the VPN server. This is done to minimize selective patching, letting other users do something but not the others.
The VPN we choose is Wireguard, not only because it is simple and lightweight, it also lets us to do IP masquerading easily. Kak Faishol are the one that manages this part of the platform.
Closing
This event has actually been the most fun to develop, maintain, and to watch. I certainly learned a lot during the time, and become much more interested in the world of DevOps. Who knows, maybe I'll go into this rabbit hole in other time?
Many thanks to kak Faishol (aka bonceng) once again for the many help he provides while building this platform! Without his help, this platform certainly wouldn't exist.
Check out the repositories for the backend and the frontend!
Thanks for reading!